
The new refrigerator just got wheeled into place, the installer is packing up, and the manual is already headed for a kitchen drawer you will not open again for years. The warranty card is loose in a shopping bag somewhere. The receipt lives in an email you will never search for.
Six months from now, if that appliance leaks, hums, or stops cooling, you will be digging through drawers and inboxes trying to remember when you bought it and whether it is still covered. The moment right after appliance installation is the easiest time to capture the details you will desperately need later, and the easiest time to lose them forever.
In this guide, you will find a simple way to turn one new appliance into the start of a full home inventory, starting with what to do before the installer walks out the door. Keep reading to learn how a few minutes of documentation now can save you real money later.
Capture the Details Before the Installer Leaves
The installer is standing in your kitchen for a reason, and that reason will not last. Get the details down while the appliance is still new, the packaging is still around, and someone is there to answer questions.
This window closes fast. Once the box goes in the recycling bin and the installer drives away, you lose access to information that is hard to recreate later.
Photograph the Model Number and Serial Plate
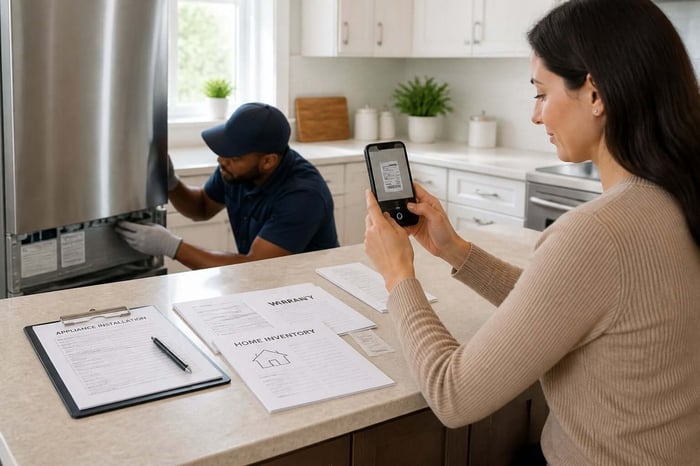
Every major appliance has a rating plate with the model and serial number, usually on the back, inside the door, or along an edge. Take a clear photo of it before the appliance gets pushed against a wall. If the plate is ever hard to read later, this guide to decoding appliance model numbers can help you make sense of it.
This single habit solves a common headache. When a repair technician asks for the model number two years from now, you will not need to move a 200-pound refrigerator to find it.
Record the Purchase Date, Installer, and Service Details
Write down who installed the appliance, the date, and any service ticket or order number from the retailer. If a plumber or electrician handled part of the job, note their name and contact information too.
This matters more than it seems. Many manufacturer warranties ask for proof of professional installation, and some coverage depends on knowing exactly who did the work and when.
A quick photo and a short note take less than two minutes. Once you have those basics locked down, the next step is making sure the paperwork that came in the box does not disappear.
Save the Records That Matter When Something Breaks
The paperwork that comes with a new appliance feels disposable in the moment, but it becomes valuable the first time something goes wrong. Treat it like part of the appliance, not packaging.
Appliance repair calls move faster when you can answer basic questions right away instead of hunting for information while a technician waits.
File the Appliance Manual and User Manual
The appliance manual and user manual explain everything from error codes to recommended cleaning cycles. Keep a digital copy, since paper manuals get tossed, wet, or buried in a drawer. If yours is already missing, this resource for finding and storing appliance manuals explains where to look.
Most manufacturers post manuals online by model number, so even if the physical copy vanishes, you can usually track down a replacement if you saved that number from the rating plate.
Keep the Receipt, Warranty Terms, and Installation Photos
The receipt proves the purchase date, which determines when your warranty starts and ends. Warranty terms spell out what is covered, what voids coverage, and how long you have to file a claim.
Keep these together with the installation photos as one small file:
Original receipt or order confirmation
Warranty card or digital warranty confirmation
Photos of the model and serial plate
Installer name and installation date
Any inspection or delivery paperwork
Document Parts, Labor, and Future Appliance Repair
If the appliance ever needs a repair, note the date, the part replaced, the cost, and who did the work. This becomes a short history that saves time on every future appliance repair call.
A washing machine that needed a new pump last year, for example, gives a technician useful context if it starts leaking again. Instead of starting from zero, they start from a record.
With your paperwork and history in order, the next question is whether your home was actually ready for this appliance in the first place.
Prepare Your Home Before Delivery Day
A smooth appliance installation depends on what happens before the truck arrives. Most delays trace back to something that could have been checked days earlier.
Skipping this step is how installers leave without finishing the job, which means another delivery fee and another day of waiting.
Confirm Space, Clearance, and Access
Measure the appliance, the doorway it needs to pass through, and the final spot where it will sit. Include clearance for doors to open fully and for air to circulate around the back of refrigerators and dryers.
Hallways, staircases, and tight kitchen corners are the most common failure points. A refrigerator that fits through the front door can still get stuck turning into the kitchen.
Check Power, Gas, Drainage, and Water Connections
Confirm the outlet is grounded and rated for the appliance, especially for ovens and dryers that draw more power. For a dishwasher or washing machine, check that the water supply line and drain are in working condition before delivery day.
Gas appliances need a certified connection and a nearby working shutoff valve. If you are unsure whether your gas line meets current standards, have a licensed technician check it before installation day rather than during it.
Understand Limits Set by Local Codes and Installer Policies
Local codes often dictate venting requirements for gas ranges and dryers, clearance from combustible material, and electrical grounding standards. Installer policies add another layer, since many delivery companies will not disconnect your old appliance or connect gas lines due to liability.
Confirm whether your installer disconnects the old unit or only delivers the new one
Ask if gas connections require a licensed plumber separate from the delivery team
Check whether your municipality requires a permit for gas or electrical appliance changes
Getting the space and connections right on day one means the appliance runs the way it should from the start, which sets up the next habit worth building: a maintenance routine that keeps it that way.
Turn a New Appliance Into a Maintenance Routine
A new appliance runs best in its first year, and that performance holds up longer when you start good habits immediately instead of waiting for a problem to force your hand.
Manufacturers build maintenance schedules for a reason. Skipping them is one of the fastest ways to shorten an appliance's life and void coverage.
Add Tasks to Your Home Maintenance Checklist
Add the new appliance to an annual home maintenance checklist the same week it arrives, not after the first sign of trouble. A dishwasher filter, a refrigerator coil, and a dryer vent all need attention on different timelines.
Grouping these tasks by season makes them easier to remember:
Quarterly: clean dishwasher filter and refrigerator coils
Twice a year: clean dryer vent and check washing machine hoses
Annually: inspect oven door seals and range igniters
Follow the Manufacturer Schedule From Day One
The manual that came with your appliance lists a specific maintenance schedule, and it is worth following instead of guessing. Manufacturers test these intervals against real wear patterns, not general assumptions.
Following it from day one, rather than starting after year two, keeps small issues from becoming expensive ones. A refrigerator with clean coils simply works less hard than one that has never been cleaned.
Track Work That Protects Performance and Coverage
Every filter change, every coil cleaning, every inspection is worth a quick note with the date. This is exactly the kind of home record services like Manse are built to hold, so a maintenance history stays attached to the appliance instead of getting scattered across memory and old receipts.
This habit pays off twice: the appliance runs better, and you have proof of care if a warranty claim ever depends on it. Speaking of warranty claims, it is worth knowing exactly what coverage you have before you need it.
Know Which Coverage Applies Before You Need It
Coverage confusion costs homeowners real money, usually at the worst possible moment. Knowing what applies to your appliance now means you are not guessing during a breakdown.
A manufacturer warranty and a home warranty are not the same, and mixing them up can lead to denied claims or paying for something already covered.
Compare Manufacturer Warranty and Home Warranty Coverage
A manufacturer warranty comes with the appliance and typically covers defects for a set period, often one year for parts and labor. A home warranty is a separate paid plan that can cover repairs across multiple systems and appliances, sometimes even after the manufacturer warranty ends.
Check both documents for exclusions. Some home warranty plans exclude appliances that weren't professionally installed, which is another reason installer records matter.
Watch Expiration Dates Before a Costly Failure
Consider a refrigerator with a one-year manufacturer warranty on the compressor. If the compressor fails in month thirteen, the homeowner pays full price for a repair that would have been free thirty days earlier.
Tracking expiration dates protects against this exact scenario, since a reminder set at installation gives you time to decide whether extended coverage makes sense before the original warranty runs out.
Understand Why Maintenance Records Can Matter
Some warranty claims get denied because a homeowner cannot prove routine maintenance was performed. A filter that was never changed, or a vent that was never cleaned, can be used to argue the failure was preventable neglect rather than a covered defect.
Keeping dated maintenance records, even simple ones, gives you something to point to if a claim gets questioned. That kind of proof is worth far more after a breakdown than it costs to maintain during calm, uneventful months.
Keep Your Home Records Ready for the Next Problem
One appliance is manageable to track in your head. A home full of them is not, which is why the habit needs a system instead of good intentions.
The goal is not perfection on day one. It is a record that grows every time you add or replace something in your home.
Build a Lasting Inventory One Appliance at a Time
Start with whatever you just installed, then add the next appliance the next time something changes. Over a few years, this becomes a full home inventory covering every major system without ever feeling like a weekend project.
Refrigerator and freezer
Dishwasher and garbage disposal
Washer and dryer
Range, oven, and microwave
HVAC system and water heater
Each entry needs the same basics: model number, purchase date, warranty terms, and any service history.
Frequently Asked Questions
How much does it cost to have an appliance installed in your home?
Most appliance installations run between $150 and $400, depending on the appliance type and whether plumbing or electrical work is needed. Gas appliances and built-in units tend to cost more due to added labor and code requirements.
Do appliance retailers offer free delivery, installation, and haul-away?
Some retailers include free delivery and basic installation with purchase, especially during sales events, but haul-away of your old appliance is often a separate charge. Always confirm what is included before delivery day, since policies vary by retailer and location.
Can you install a new appliance yourself, or should you hire a professional?
Simple appliances like microwaves or freestanding units are often DIY-friendly if you follow the manual closely. Gas appliances, built-in units, and anything requiring new electrical or plumbing work should go to a licensed professional to protect both safety and warranty coverage.
What does appliance delivery and installation service usually include?
A standard service includes bringing the appliance inside, placing it in position, connecting it to power, water, or gas, and running a basic test. It typically does not include disconnecting or removing your old appliance unless you request and pay for haul-away separately.
Does Home Depot install appliances, and what do they charge?
Home Depot offers appliance delivery and installation services through in-house or partnered installers, with pricing that varies by appliance type and location. Costs typically fall in the same $150 to $400 range as independent installers, with additional fees for haul-away or complex hookups.
Does Lowe's install appliances after delivery?
Lowe's offers similar delivery and installation services, including connection of water, gas, and electrical lines depending on the appliance. As with most retailers, confirm what is included in the base price versus what counts as an added service before your delivery date.
Store Your New Appliance Details in One Private Place
Scattered paper and old emails work until the day you actually need them, and that day always arrives without warning. A private, organized record means you never have to rebuild history from memory in a stressful moment.
Add your appliances to Manse for free and know exactly where every warranty stands. Building your home profile takes minutes, doesn't require a credit card, and has no setup hassle. The next time something breaks, your records are already there, ready the moment you need them.